Thursday, May 31, 2018

8 Quick Summer Landscaping Tips

Memorial Day is behind us now.  Summer is “unofficially” in swing.  Here are 8 quick summer landscaping tips to keep your outdoor space looking great!

1. Be on the lookout for turf problems

The beginning of summer means the beginning of “turf disease season!”  High humidity paired with relatively warm overnight temperatures turns your lawn into a petri dish for a whole host of fungi.  They all require the fungal spores to be present, along with a host (the grass) and the right growing conditions (like those described above).  A couple of common turf diseases to look for include:

Red Threadmycellium

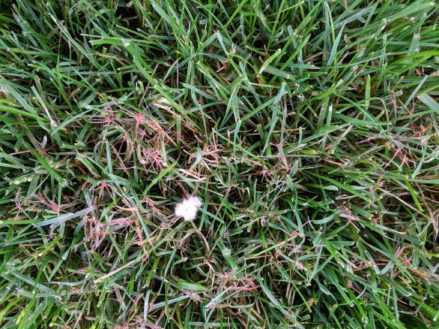
This disease looks pretty awful, but it’s really pretty harmless.  It almost looks like cotton candy is caught on the blades of the grass.  A fertilizer application will help the turf push new growth and will cause the grass to “outgrow” the progression of the disease.  Additional treatment is usually not necessary.

Pythium Blight

Pythium blight really shows up in our area once our summer temperatures hit.  High heat helps this fungus breed, along with an extended period of “wetness” on the turf.  Treatment is absolutely necessary – your lawn will likely die without it.  This disease spreads quickly, and even if you call your lawn care pro, the turf may be dead by the time they get there to treat anyway.  Don’t play around with this exceptionally quick-spreading disease!

Brown Patch

According to Turf Magazine, brown patch is the most common disease distressing Kentucky bluegrass, tall fescue, and perennial rye – which is mostly what’s in our lawns in Central Pennsylvania.  This disease usually requires corrective treatments once it’s shown up on a lawn.  If you know you have a history of it, you should start preventive treatments in late May as a general rule.
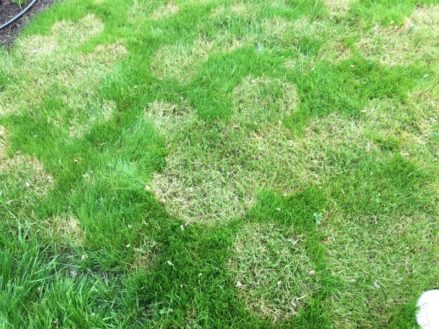
dollar spot ringsDollar Spot

Named for the “silver dollar” shaped rings it leaves on the turf as it grows.  Dollar spot is unsightly and certainly puts an added level of stress on the turf.  However, in our area, only advanced stages of the disease should be treated.  Usually, a good fertilizer application will help the turf push new growth, preventing the disease from doing much damage.

2. Raise the lawn mower/mow less frequently

We often get the phone calls in the summer from clients who are concerned their lawn is “dead.”  We appreciate those calls, because it gives us a chance to inspect for the diseases mentioned above.

Often times it is simply a case of heat and/or drought stress.  This is actually a pretty natural part of the turf’s lifecycle.  In our area, cool-season grasses are the norm.  These types of grass grow really well in Spring and Fall, when temperatures are cooler.  They don’t like hot, dry weather, like we typically experience in July and August.

As a result, the lawn enters a period of dormancy as a defense mechanism.  Think of it like a bear hibernating for the winter because food is scarce.  Same with the grass – moisture is less available, so it’s just riding out the hot, dry spell.  The grass quits investing so much energy into vertical and root growth and begins to store nutrients and moisture in the leaf tissue (grass blades) to wait until conditions improve.

What you should do

What all this means for you as the homeowner is two things.  First, raise the height of the mower.  If you mow longer, you leave more moisture in the plant itself, making it more resilient to heat and drought stress. You never want to mow off more than 1/3 of the leaf blade in a single mowing, as this can cause stress to the plant.  Also, make sure you’re leaving the grass long.  Turf should be no lower than three inches after mowing is complete.

Secondly, you can mow less frequently.  If the grass isn’t growing as quickly, you don’t need to mow.  Start adjusting your mowing habits to reflect the growth of the lawn rather than being wed to a calendar day (like mowing every Saturday).  You may only have to mow every two-to-three weeks during this time.

3. Apply grub control to the lawngrub damage

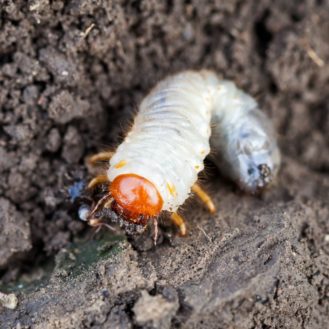
There are at least half a dozen species of beetle in our area that lay eggs in the soil that damage turf.  While the May-June beetle, green June beetle, and European chafer may not get a lot of press, their larvae (grubs) can be just as destructive as their more famous cousins, the Japanese beetle.

These beetles feed on landscape plants, mate, and lay eggs in the soil. When those eggs hatch, the larvae reach their next stage in maturity by feeding on the roots of your lawn.  When they’re present in high numbers, they can do significant damage to the lawn by eating the grass roots up to the soil surface, which obviously kills the grass plants.

What you should do

Applying a grub control to the lawn in the summer (many people use the July 4th holiday as a reminder) will help protect your lawn against damage.  These products can be found in your local home center or hardware store and come from a variety of manufacturers.  Keep in mind that these applications typically need to be “watered-in,” so plan it around rain showers or get out the sprinkler for the best results.

4. Trim some shrubs

There are some shrubs that you really should consider trimming in the summer.  These include lilac, forsythia, azaleas, rhododendrons, and some species viburnum.  Basically, if it blooms once a year and is done blooming now, trim it.  The reason is pretty simple: they’ve bloomed now.

What you should do

Trimming these plants after they’ve bloomed ensures you’ll still get to look at the beautiful flowers.  It also means that they have plenty of time to push new growth before next year.  Lastly, it ensures that you won’t interfere with next season’s blooms!

Bucket truck with Pole Saw5. Get trees pruned

Many folks assume that it’s a spring or fall task to have your trees pruned.  They’re wrong. You can prune most trees year-round.

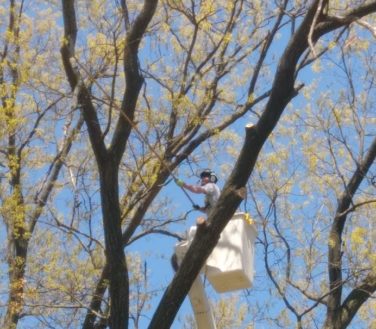
This is a service you can do yourself, but we generally recommend against that.  Improper pruning can lead to problems that make the tree sick or vulnerable to pests.  This can kill the tree down the road.

Tree pruning is also a pretty dangerous enterprise.  According to the Bureau of Labor Statistics, in 2016 there were 166 incidents where a full-time worker was injured primarily by “Plants, trees, or vegetation – unprocessed.”  Their spreadsheet (click on “Primary and secondary source of injury by major private industry division, 2016” to open the spreadsheet) indicates that 146 of those incidents were related to “Trees, logs, limbs – unattached.”  Translation: pruning and trimming trees is highly dangerous, even if you’re a professional.

What you should do

Safety first!  Contact a knowledgeable professional with a good reputation, because their backlogs often run several weeks.  It’s a good idea to bank on that and plan your job well in advance.

As an added bonus, if it’s hot and dry outside the ground is likely firmer.  A firmer soil means fewer ruts in the lawn if they need to drive equipment (like a bucket truck) across it.

6. Edging and mulching

Yes, you read that correctly.  Most people assume this is an “all or nothing” proposition in the Spring.clean mulch line

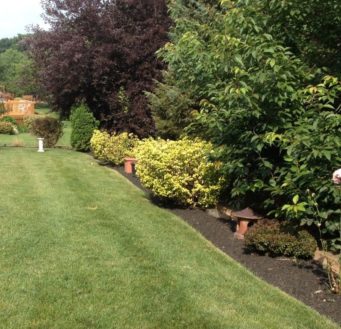
The truth of the matter is that this can be done throughout the year.  We even have several clients that get their edging and mulching for the season done in Fall.  (When the snow melts, they usually just have to blow the leaves out of the beds and they’re done with Spring cleanup!)

What you should do

Mulching serves two main purposes on your landscape.  The first is that it holds in moisture that the plants get and keeps the root system healthy.  When we do get some rain, the mulch prevents that water from evaporating immediately, and allows it to soak into the ground.  When it’s hot and dry, and moisture is scarce, you want your plants to have something to hold that moisture in.

The second purpose of mulching is to keep weeds down.  Many weeds will grow far more rapidly and in much worse conditions than your landscape plants.  Giving them every chance to compete is just common sense, right?

Edging the beds helps hold the mulch in place.  Plus, it gives you the added bonus of distinction between your lawn spaces and bed spaces, for a clean, manicured look.

7. Apply pre-emergent weed control to the beds

You can actually apply products to your flower beds that prevent weeds from growing.  These are called “pre-emergent” herbicides, because they are applied before the weeds emerge.  There’s a direct comparison to your lawn care – crabgrass control early in the Spring is a pre-emergent herbicide.

What you should do

Depending on the product you decide to use, you should apply your first or second treatment of pre-emergence.  If you’re using an “over-the-counter” product like Preen, you want to re-apply mid-season to keep weeds down throughout the year.

However, there are many options for these types of products.  If you’re hiring a professional, they may be able to use other products like Barricade (prodiamine) or Dimension (dithiopyr) to give you an extended period of control for weeds.

spruce 8. Inspect your landscape for potential problems

Familiarity with your landscape is important here.  Different species of plants get different problems at different times of year.  Knowing what trees and shrubs you have in the landscape is the first step toward keeping those plants healthy.

For example, if you have pets, you wouldn’t feed your dog and your cat the same thing.  You also (hopefully) don’t use the same medication on them to control fleas and ticks.  The same principle applies as a parent – there are some things you have that are hard-and-fast rules for all the kids.  But, you undoubtedly allow for differences in age, maturity level, and personality on the “negotiable” items.

What you should do

It is very similar for your trees and shrubs.  If you shouldn’t treat your boxwoods for pest activity at the same time of year you treat your arborvitae.  They are susceptible to different pests, and need treated for those pests at different times of year.

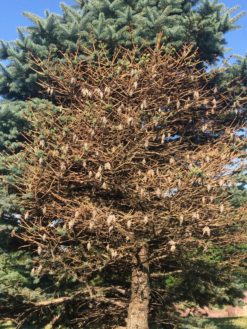
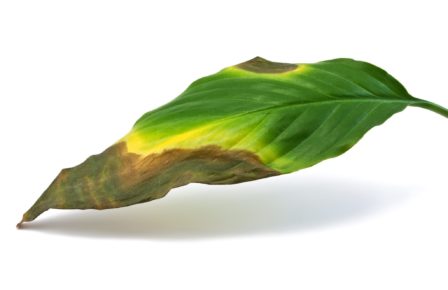
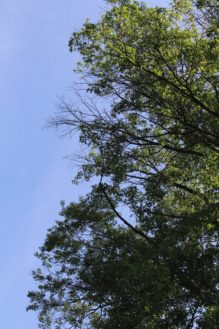
Look carefully at anything that doesn’t look “right” with the plants – spots on leaves, curling or cupping of leaves, holes in leaf tissue, browning of needles, needles dropping in the summer – you get the idea.  If it doesn’t look healthy, it’s probably not.  Figure out what plant it is and do a quick internet search for “problems with                    plants” to find out what issues are common to them.  Another search string might be “What’s wrong with my                        tree?” for a fast result.

Knowing which plants you’re treating, and what to do about the issues, is key.


If you have questions, we’d love to talk with you about summer landscaping tips at your property.  Contact us for your free consultation.


The post 8 Quick Summer Landscaping Tips appeared first on Tomlinson Bomberger.


from Tomlinson Bomberger https://ift.tt/2HaardR

Wednesday, May 30, 2018

Five Seasons: The Gardens of Piet Oudolf by Allen Bush


Five Seasons: The Gardens of Piet Oudolf opens with Oudolf pulling out colored pens and drawing, with his left hand, bright squiggles, slashes, curlicues and abbreviated Latin plant names. Oudolf’s paper drawings and seasonality become seductive themes of Thomas Piper’s film. “Yeah, it may look wild, but it [his gardens] shouldn’t be wild. This is what you’d like to see in nature,” Oudolf explains.

I watched Five Seasons in mid-May at Louisville’s Speed Museum Cinema. Thomas Piper, the film’s director and producer, was introduced by Tom Smarr, who worked with Oudolf on the High Line in New York. Smarr is now the Horticulture Director of 21stCentury Parks and the new Parklands of Floyds Fork in Louisville.

First drawn by Oudolf’s garden aesthetics, Piper was soon enticed by Oudolf—the character.

Oudolf cuts an impressive figure. He’s tall and handsome with a full head of stylish silver hair. The 73-year-old Oudolf doesn’t come off like a “rock star” or “cool guy,” according to Piper in the Q & A following the film. “He doesn’t draw people into a frenzy, but he does draw a crowd.”

Oudolf and his evocative garden designs have been drawing international attention since he designed the Royal Horticultural Society’s Glasshouse Borders in Wisley, England. (I’m not sure anyone from the Netherlands has made such a garden impact in the United Kingdom since William of Orange introduced topiary.)

Oudolf’s naturalistic plant palette of perennials and grasses has been honed from years of observation in gardens and in the wild. “It’s all about atmosphere,” Oudolf says. Visiting natural  places was, and continues to be, an important piece of his learning curve.

During the filming, he visits the Texas High Country in spring. Thousands of bluebonnets and Texas paintbrushes are in glorious bloom in the seasonal rush before hot temperatures and unpredictable summer rainfall signal a hasty end to the ephemeral outburst.

There’s a funny segue during this portion of the film where Oudolf takes a break from plant hunting to visit a pit barbecue joint. “Completely insane,” he says, overcome by the Texas blooms and slow-cooked pork ribs.

Oudolf always wanted to create something but didn’t realize the richness of plants while he was growing up in a family of restaurateurs and barkeeps. The bright light wasn’t turned on for him until he was in his mid-20s, when he got a job in a garden center. “It was something I needed and didn’t know it.”

Oudolf and his wife, Anja, bought a home and property in Hummelo, Netherlands, and opened a nursery in 1982.  They began creating their garden. Growing nursery plants, and gardening, provided a means to study plants and eventually make a living. “Piet is always lucky when I’m with him,’ Anja says. “She’s the force behind me as you can imagine,” Piet responds.

Oudolf became a friend of author and garden designer Henk Gerritsen, who had learned lessons from Mien Ruys, the past doyenne of Dutch design. Gerritsen preferred a softer and more natural color palette to Ruys’s bright colors, but he liked her artistic expression. Gerritsen and Oudolf hit it off. In 1990 Gerritsen co-authored with Oudolf  their first book together, Dream Plants for the Natural Garden.

Oudolf Garden. Hummelo, Netherlands.

Oudolf’s signature American designs are the Lurie Garden in Chicago’s Millennium Park and the High Line in New York. Thankfully, Oudolf found Wisconsin nurseryman Roy Diblik during the Lurie Garden planning. Diblik visits prairies in his spare time to understand the nuances of native plants he’s growing in his nursery. Oudolf and Diblik are kindred spirits. Diblik supplied many of the perennials for the Lurie Gardens. The Lurie Garden was Oudolf’s first attempt at a pure natural planting. “You could not control, only conduct.” Oudolf is adventurous with his diverse choice of native and non-native plants. “If they don’t behave, we throw them out of the community.”

Is Oudolf’s work political? “The environment is under pressure. Will it save the world? I don’t know. At least it will save me.”

The Lurie Gardens, which had once been a parking deck, “may not be a miracle, but almost” according to Oudolf.  The Lurie was an inspiration for new ideas and became the narrative for the wildly popular High Line.

Tom Smarr was the High Line’s Horticulture Director. “Piet is a true artist,” Smarr said, during the film’s introduction at the Speed Museum. Oudolf doesn’t fuss around. He told Smarr, “Take it out if it’s not working.”

Oudolf is shown drawing plans for a staggering 57,000 perennials and grasses at Hauser and Wirth Garden at Durslade Farm in Somerset, England. Manuela Wirth said, “I thought your garden drawings were sexy.” The 72-year-old smiled wryly and said, “I was, in my past.” He is secure in his own skin.

Oudolf issued a caveat of what to expect at the new garden. Patience will be required. Some plants will be “screaming” (for joy) while others will be “crying.” Patience is imperative.  An Achillea will make a splash the first year while an Eryngium may take two or three years.

“A garden is also a promise. It doesn’t have to be there. You’re looking forward to what will be there.”

Understanding what will be there requires imagination.

I hope you get a chance to see Five Seasons: The Gardens of Piet Oudolf. Here’s the list of upcoming screenings.


Photos courtesy of Thomas Piper


Five Seasons: The Gardens of Piet Oudolf originally appeared on Garden Rant on May 30, 2018.


from Garden Rant https://ift.tt/2Je5AgN

Monday, May 28, 2018

Navigating With Butterflies – Up, Up and A Weigh by Bob Hill

As it turns out butterflies are not free. They can cost anywhere from $3 to $6 each. They will arrive at your doorstep in small white insulated boxes carried by FedEx trucks with purple and orange logos. They will come tightly sealed in skinny envelopes with necessary ice packs included. Then you can then pop that tight package of butterflies into a refrigerator or ice chest until a grand release.

What’s wrong with that picture?

The entire journey is slightly reminiscent of the days when Mom and Dad would stuff us five kids in the old Studebaker for a Sunday drive. Except for the ice packs part. And my older sister picking on me.

That was all so easy compared to Monarchs’ trips from Mexico to Minnesota to Montreal and back home again – a remarkable journey that can require four or five generations of sadly fluctuating numbers covering thousands of airborne miles.

Talk to me all you want of science, biology and ultraviolet light explanations, how do they do that?

If it’s the shipping costs that bother you, the good news is most butterflies only weigh about .04 grams to 0.3 grams each, although New Guinea’s Queen Alexander Birdwing butterfly – the heavyweight in the field – can go 12 inches from wingtip to wingtip and weigh two grams.

As a result, those shipping costs can vary from the ubiquitous free if you have already paid way too much for your Monarchs to a mere $60 if you must have your 24 Painted Lady butterflies on hand for a special wedding day release – display cage not included.

With the average cost of a wedding in the United States in 2017 at $33,391 – honeymoon and uber drivers not included – what’s $60 for a ceremony that could last roughly as long as the marriage?

All my butterfly due diligence occurred as result of an early spring whim to own a butterfly dome that could draw nursery customers to our place during July and August when the most sane of them stay indoors watching the neighborhood kid mow their lawns.

The dome was the easy part; a 22-foot arched wonder made of metal hoops, some sort of rubberized clamps and a red-yellow-and-black shade-cloth screen to hold in butterflies desperately seeking ways out.

Yes, of course, some guilt came with this. I could hear the environmentalists thunder:

You shipped in butterflies in small boxes in FedEx trucks to stuff them into a refrigerator to eventually set them partially free in a gawdy dome where they could and will die without actually ever setting foot or wing on a freed bee balm?

You’re going to turn them loose in a man-made cage to feed on orange slices, watermelon and sugar water? Do the words “pollinator plants” mean nothing to you? Is that what you believe God had in mind for those wonderful creatures?

Well, not exactly. But God doesn’t have to pay my water, electric and potting soil bills either. And we did add potted butterfly bush, zinnias and lots of various milkweeds to the inside mix. Plus including a running fountain, overhead sprinklers and mulch.

All in all it was a hellavu lot more than the Hill kids got in the back seat of the Studebaker.

Upon further inspection of this entire butterflies-are-not-free phenomena I began to feel a little better about my minimum-security butterfly prison.

Online investigation revealed they are now raised in butterfly factories all over the country and sold to be released on occasions that include Easter, anniversaries, birthdays, funerals, Quinceaneras, engagements, bridal and baby showers and Uncle Charlie’s bowling team retirement.

You can also purchase online caterpillars, all the chrysalis you could ever want of a dozen species and, of yeah, butterfly jewelry, images and refrigerator magnets.

In the case of the monarchs, all promotional material indicated that even when raised and shipped from California – and upon release in Indiana – their inner road maps will plug them in to that four-to-five-generation trip back home to Mexico. This long before GOOGLE maps and Waze.

How do they do that?

The self-aggrandizing counter argument goes that, sure, there may be some truth in the butterflies-as-inmates theory, but the bigger picture is the education of children. It’s the shared joy of standing there in the dome with their parents as the kids capture butterflies on short sticks laced with sugar-water or watching them flutter overhead in delightful, zig-zag ballet.

What could be more natural? Maybe those kids will all become lepidopterists instead of lawyers, journalists or real estate developers.

My personal education also came to include learning the intricacies of planting the asters, phlox, Joe-Pye weed, sages, snapdragons, lavender and zinnias that also will keep butterflies happy on the outside world.

You know: Pollinators – the hottest word in horticulture. Or, as some deservedly forgotten French poet once said, “Butterflies are flying flowers and flowers are tethered butterflies.”

Right.

Then there is the matter of the Gomphocarpus physocarpus or “Hairy Balls Plant,” a milkweed family butterfly treat and short-lived African native that imprisoned butterflies enjoy while the adults nervously wait for the kids to ask questions about the name.

If it helps – albeit not much – it’s also called bishop’s balls, elephant balls and monkey balls.

In any event, education won the day at our facility. Our butterflies arrived as advertised in a small, white somewhat-refrigerated box, were stuffed in a refrigerator, then a cooler, then released by a small crowd of elderly customers who happened to be on hand.

Childish delight ensued.

The larger release came later as a band of happy children set then free amidst smiles, laughter and genuine delight. With a half-dozen milkweed plants also in the dome, my current hope is the monarchs will lay their eggs, the caterpillars will emerge, the chrysalis will follow and adult butterflies will emerge to be set free on their amazing journeys.

One possible problem with that is the arrival of the dreaded aphids which will suck the life from milkweed plants, and butterfly eggs. Aphids can be washed away, hosed down and rubbed away. One other suggested solution – but now held in low regard – is the introduction of purchased lady bugs to eat the aphids.

Lady bugs can now also be found online, flown in from California and delivered in a FedEx truck. The problem is keeping those winged critters at home in the yard. Yet the ones I saw online were only $128 for 18,000 lady bugs or $268 for 70,000.  Plus shipping.

Navigating With Butterflies – Up, Up and A Weigh originally appeared on Garden Rant on May 25, 2018.


from Garden Rant https://ift.tt/2GZ1wMa

Sunday, May 27, 2018

Spring Flying By

It seems ridiculous to be talking about spring container plantings when our current 80 degree temperature is expected to soar into the 90’s over the new few days. But better an ephemeral spring than none at all.  April was a very tough month. Scary freezing temperatures and snow hovered over the entire month.  Planting this [...]

from Dirt Simple https://ift.tt/2Jbr7GZ

Wednesday, May 23, 2018

Is My Tree Dying? Top 5 Warning Signs

“Is my tree dying?”

Many of us can relate: there’s that one tree on our property that is our favorite.  It might provide tons of shade for the back patio in the summer time.  Perhaps it flowers really beautifully in the spring.  Maybe it was planted in memory of someone dear to you.  Whatever the reason, many of us are really attached to our trees.

And this is when the panicked calls start.  We get them on a regular basis: “I think my tree is really sick.  Can you help with that?”  The honest answer to this question (which no one really wants to hear) is “Maybe.”  Depending on the severity of the issue or the amount of irreversible damage, as professionals, we may or may not be able to do anything about it.  There are lots of factors in play that we have no control over.  For example, the presence of certain fungi, the amount of humidity and rainfall, and the actual location of a tree are often outside of our control.

The one factor working in our favor is early detection.  This increases the likelihood that your tree service company will be able to make an impact.  Here are the Top 5 Warning Signs of a sick tree:

1. Leaf Damageanthracnose

This is perhaps the easiest place to start for many homeowners.  Discoloration, deformity, or extra, abnormal “growths” on leaf tissue can all be signs of a potential problems.  These range in size, shape of spots, color of spots, and deformity of leaves or needles.  This can vary depending on the tree and the disease you’re looking for.  For example, evergreen trees are not susceptible to a disease called anthracnose.  Anthracnose only effects deciduous (leaf-dropping) trees, and is actually deadly for certain species (like an American dogwood).  Conversely, deciduous trees are not generally affected by bagworms, which prefer to feed on needle-producing evergreen trees.

What to Look For

A good practice to get yourself into is to familiarize yourself with the look of the trees in your landscape.  What do they look like in a “normal” year?  You might even want to consider doing a Google image search for what healthy leaves look like for that species of tree, so you have a baseline reference.  If you know what a healthy example of a leaf should look like, you’ll be able to tell when there’s a lesion or deformity.  Lesions, deformity, and discoloration or leaves can be indicative of serious pest or disease problems with your trees, which may lead to some of the other signs we’ll discuss.

2. Canopy Decline

This one can be a little harder to nail down.  Generally speaking, when a tree has lost about 30% of it’s canopy, it is beyond saving.  This is especially true for boring insects, like the Emerald Ash Borer.  Your tree needs a certain amount of leaf tissue to properly convert sunlight into the food it needs to survive (called photosynthesis).  Without the proper amount of chlorophyll (the chemical in plants that makes them green) exposed to the sun, the tree will begin to struggle to stay healthy.

What to Look For

In order to determine whether a tree’s canopy is in decline, you should again try to get a baseline reference.  You should try, as much as possible, to get a view of the whole tree.  This may involve walking across the street and standing on the sidewalk in front of your neighbor’s house, or asking a neighbor if you can stand in their yard to get this view.  Whatever the case, make sure you can see the whole tree to the best of your ability.

When you start to be able to see through the tree’s leaves pretty easily, that’s a bad sign.  Consider taking a picture on your phone when the canopy is full (late Spring would be good) for reference the following year.  You want to especially look for decline near the top of the tree; many tree problems will cause the tree to decline at the top first, so this is usually the place you’ll see serious problems pop up.

3. Shoot Growth Lower on Branches or Trunkwater shoots

Diseases often start in the leaf tissue and then work their way into the stems and branches, so when you see a tree pushing leaf tissue anywhere but the very end of a branch, it’s usually an indication that the tree is under some serious stress.

Here’s a fun fact about trees: they often have a “emergency fund” of nutrients stored up, just in case they need them.  They’re pretty industrious that way.  You’ve probably seen evidence of this when you see a stump that suddenly starts pushing new branches and leaves up.  Why the stump is able to push new growth when it’s been cut all the way down to the ground?  Or, for that matter, when it has been cut in such a way that all the leaves are gone?  Because it had this energy reserve saved.

But trees don’t just save this nest-egg for when someone tries to cut them down.  They’ll tap in to this fund any time they need to convert more sunlight into energy.  A pest or disease issue that causes canopy decline will often trigger this “new-growth” strategy from a tree.  In a tree that’s stressed by one of these factors, you’ll often seen new leaves popping up from much lower on the branch, or even off the trunk itself.  Trees by nature typically push new growth at the end of the branches, where it’s got the best chance of getting maximum exposure to sunlight.

What to Look For

If a tree starts pushing new growth closer to the trunk or off the trunk itself, this is a big “red-flag” that the tree is experiencing a potentially deadly form of stress.  Look for new leaves growing near where the branches emerge from the trunk or off the of the trunk itself.

4. Many Dead Branches/Pushing Growth in the Wrong Places

We covered some of this in the last point; when a tree is pushing new growth closer to the trunk than the very end of the branch, that’s a bad sign.  When you start to see lots of dead wood near the end of the branches, that’s also a very bad sign.

You will often see this, especially with disease issues on trees.  A branch may look dead at the end, but new growth is popping up lower on the branch.  Another sign to look for is a “hole” in the canopy; the canopy will look full and healthy, except where you see a branch or two that have been affected by disease and aren’t pushing leaves out.  A branch or two not pushing new growth will usually be very visible in a mature tree, as the canopy will have a large gap.

What to Look For

Many times, the tree will tap into the above mentioned “emergency fund” to push new growth as close to the end of the branch as possible.  A good way to look for this is to stand near the trunk of the tree and simply look up.  If a lot of branches with no growth on them or look dead are visible, it’s probably a sign that it’s been stressed for a period of time.

premature leaf color change
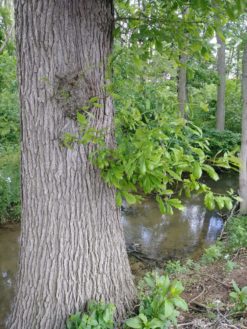
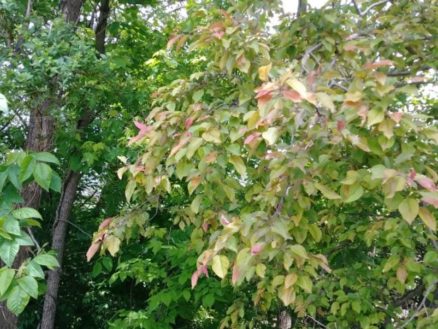
5. Early Leaf Color Change or Early Leaf Drop

We often select trees to plant or become attached to a tree because of the vibrant, beautiful color it gives us, especially in the fall.  You’ll be hard-pressed to find someone who doesn’t have some sense of awe when all the wooded areas around us here in Central Pennsylvania begin to change color.  It’s a truly breath-taking sight each autumn!

Tree leaves change color because the trees has decided to move it’s chlorophyll in preparation for winter; it is conserving energy so that it can make it through the winter in a healthy way.  There are other chemical changes happening, like the one the seals the place where the leaf attaches to the stem (like a scab covering a wound) so that no infections can harm the tree.

However, when this color change, and the subsequent shedding of leaves, happens much earlier in the season than normal, it’s usually a good indicator that the tree is in trouble.  Sometimes, when the issue is severe enough, instead of pushing new growth, the tree will decide instead to “cut losses” and go into an early winter hibernation.  Think of it like a “fight or flight” response for a tree; new growth is the “fight” response, while the shedding of leaves and closing up shop early is the “flight” response.  Instead of wasting energy trying to produce more energy, the tree decides that it cannot out-produce the loss.  So, it tries to minimize the damage by waiting until conditions improve.  It decides to “ride it out” until things get better.

What to Look For

When the tree reaches this grim conclusion, it’s in a really bad place.  You want to look for leaves that are changing color far too early.  Here in Central PA, a tree changing color in July or August is a bad sign.  You might even be concerned about leaf drop in late August or September, depending on the species.

Comparing the tree you’re concerned about to other trees is also helpful.  Are all the trees in your area changing colors?  If so, you might not need to be as worried.  If not, your tree might be in dire straits.

Conclusion

Now you’re armed with some helpful tips to determine if your favorite tree is in trouble.  You should contact a Certified Arborist to examine your tree and recommend the appropriate treatment, if possible.  You should also be prepared to hear the worst, and take the recommendation of the Arborist you’ve selected.  That means you may need to have the tree removed.

If you’d like to talk to one of our ISA Certified Arborists about your tree’s health, we’re happy to help.  Contact us, and we’ll be in touch with you shortly.

The post Is My Tree Dying? Top 5 Warning Signs appeared first on Tomlinson Bomberger.


from Tomlinson Bomberger https://ift.tt/2xcB8z8

Tuesday, May 22, 2018

Container rules are meant to follow, bend, or break by Elizabeth Licata

I love this shape for smaller pots.

In a recent column, Washington Post gardening columnist Adrian Higgins addressed the long-hallowed “thriller/filler/spiller” theory of container gardening. He defended it and debunked it at the same time, which seems right to me. While it’s true that the drama of a tall plant is heightened by contrasting plants that spill over the sides and fill in the middle, there are plenty of other ways to create great containers. One big beautiful plant—papyrus, coleus, colocasia, banana—or a colorful array of dense annuals can be glorious in a good container. Ordinarily, however, I do like color contrast. My favorite contrasts are various permutations of yellow/purple/white, and green (light green). It tends to work better if the contrasting plants have different forms and textures, so you find yourself following t/f/s almost by default.

There are other elements where I agree and disagree with the how-tos.

Soil
The recommendations are always to provide brand-new potting soil with every planting; problems such as disease, compaction, and too many fertilizer salts are cited. Often I have no choice, because when I take old plants out, their roots have completely taken over and there’s no soil left. But if there is soil, I compromise, mixing in some new, but keeping the old, and fluffing it up a bit. I’ve never seen a problem. I always use some type of potting mix.

This (the little black one) is the smallest container I’ve ever planted. Probably not in there for the long haul.

Containers
My personal rule is the bigger the better, in most cases, and I hate plastic. So that lands me with some heavy containers. I’ve tried to use fewer and better pots over the years; I’ve also found that if I cover them with tarps, I don’t have to store them over the winter. They survived Buffalo’s recent winter with no problem. That helped when it came time to set them up.

Please note: the whole idea of putting shards, gravel, packing peanuts etc. in the bottom of pots for drainage has been thoroughly debunked by our friends, the Garden Professors, many times. Just google it.

Milk delivery box

Goofy containers
It’s fun to have a few of these, but not too many. Every Garden Walk, I get comments on the old metal milk delivery box I use for a big shade plant or summering house plant and the old coffee pot that holds … whatever it holds that year. It’s as close as I get to the dreaded garden “whimsy.” (Hate this word.)

I know that some gardeners think of containers as high maintenance or otherwise troublesome. Not me. They’re excellent vehicles for experimenting with new annuals, enjoying tropical outside, and having fun with color. Agree?

Container rules are meant to follow, bend, or break originally appeared on Garden Rant on May 22, 2018.


from Garden Rant https://ift.tt/2LmE9Q3

Saturday, May 19, 2018

Kentucky’s Secret Gardens by Allen Bush

Looking for inspiration and information? Catch a glimpse of Kentucky’s Secret Gardens.

Author Tavia Cathcart Brown hosts the documentary, sponsored by Kentucky Education Television (KET). I was flattered to be included in a small piece of the first round of Kentucky’s Secret Gardens, and I enjoyed the show more than I had imagined. Videographer and Co-Producer Frank Simkonis shot some beautiful footage. The drone shots of the prairie are way cool.

As soon as I walk into a garden I can tell if it is loved or not. I’m partial to gardens that are tended hands on. Passionate and committed gardeners have created vastly different Kentucky Secret Gardens. See for yourselves.

I’ve never been to these Kentucky secret gardens. (Where have I been?) I’m ready to pack the car for a road trip to Woodford County, Lexington, Newport, Berea, Eubanks and Louisville. I’d love to visit them all.

The program held my attention from beginning to end. Rose enjoyed it, too, but thought that, clocking in a little shy of one and half hours, it should have been divided into two or three segments. You can tape the show, if you’re in KET’s range or stream it from anywhere. There’s a good chance, based on early feedback that the success of the documentary might lead to a series of half-hour shows. I am all for that, as there is no shortage of beautiful Kentucky gardens.

The documentary is dedicated to the best-selling author and secret gardener Sue Grafton who passed away during the production of Kentucky’s Secret Gardens.

There’s much more to see on Kentucky’s Secret Gardens.

(You can cue the segment on our two-acre Salvisa prairie at 40 minutes.)

Tune in.


Photos courtesy of Kentucky Educational Television

Kentucky’s Secret Gardens originally appeared on Garden Rant on May 19, 2018.


from Garden Rant https://ift.tt/2ISSuFu

Friday, May 18, 2018

Making Gardens Safer from Ticks: No More Wildlife Gardening by Susan Harris

I recently wrote about how gardeners freaked out about Lyme Disease are supposed to dress for gardening. It’s NOT a pretty picture and to prove that I’ll be posing for a shot of me in near-hazmat attire, ready to tackle a few gardening chores in my garden.

Today we explore the tick-prevention changes we’re told to make to our gardens, a subject that’s even more depressing.

How Ticks get on Gardeners

About 70 percent of people that contract Lyme disease catch it from ticks in their own yards. So how does it happen?

Ticks do not jump, fly or drop from trees, but grasp passing hosts from the leaf litter, tips of grass, etc. Most ticks are probably picked up on the lower legs and then crawl up the body seeking a place to feed. Adult ticks will, however, seek a host (i.e., deer) in the shrub layer several feet above the ground.”

Of ticks that are in our lawns, most (82%) are located within 3 yards of the lawn perimeter, particularly along woodlands, stonewalls, or ornamental plantings. Tick abundance in manicured lawns is also influenced by the amount of canopy vegetation and shade. Groundcover vegetation can harbor ticks. Woodland paths also may have a high number of ticks, especially adults, along the adjacent grass and bushes. Source – Tick Encounter.

Here’s what we’re told to do to make our gardens safer:

  • Reduce ticks on your property by pruning trees, clearing brush, removing litter, mowing grass short, and letting it dry thoroughly between waterings.
  • Create a three-foot wide barrier, three inches deep, between lawns and wooded areas using gravel, mulch, or wood chips.
  • Trim back vegetation along paths, trails, and yard edges
  • Avoid overwatering.
  • Use cedar mulch or gravel.
  • Use plants that are undesirable to deer. Apply deer repellents and/or deer fence.
  • Avoid fruit trees/clean up fallen fruits.
  • Move shrubs and overgrowth farther away from areas frequented by people.
  • To make your yard unattractive to host animals, eliminate bird feeders, bird baths and salt licks; erect fencing around the property; clear away woodpiles, garbage and leaf piles; remove stonewalls that provide homes to wildlife.
  • Have your property chemically treated.
  • Altering the landscape to increase sunlight and lower humidity may render an area less hospitable to ticks.
  • Prune plants so provide open space between the ground and base of the plant.
  • Restrict the use of groundcovers to less frequently used areas of the yard. Primary source.

Yet this illustration and a comment about it demonstrate that “ticksafe” zones are far from foolproof.

That may just be one anecdote but neighbors have tell me they get ticks just from walking on mowed grass, so I’m assuming there’s no safe height for turfgrass.

Can we Still Have a Wildlife-Friendly Yards?

I found one source addresses this obvious dilemma:

Little information is available on how to integrate these two different objectives. Open lawns harbor fewer ticks and wildlife that carry potentially infected ticks. Fencing against deer will allow greater landscape flexibility. While data is limited, meadows appear to harbor few blacklegged ticks except along the edge with woodlands, dense vegetation and stonewall.

Meadows are safer than what – shrubs? – but not as safe as open lawn, except around the edge. So if we could transport ourselves into the interior of a meadow somehow, we’d be safer than…. oh to hell with it! The take-away here is obviously that “Little information is available,” to which I’d add “but it’s obvious that wildlife gardening is the opposite of tick-safe gardening.”

About the suggestion that people spray “to protect your yard,” another source says:

“To treat your yard or other outdoor areas, a product called SEVIN can be applied. Sevin seems to have the least offensive chemical odor and is recommended for killing ticks. It can be applied to your dogs bedding area to help kill ticks that may gather there. Carefully follow the directions on the label. Sevin is usually less expensive than some of the other products on the market.”

Wait! Readers are concerned about the smell and the cost but not about what else Sevin kills besides ticks? What about those 500 “pests”?

More on spraying: “Consider removing shrubbery and flowers from the base of your house or treat those areas with Sevin to prevent ticks from being in close contact with your home. Removing shrubs will also discourage animals from nesting or bedding there.”

Sure, while I’m removing most of the damn plants in my yard, why not all the foundation plants, too?

And oh, this makes me crazy: “Consider making your pets either inside pets only, or outside pets only.” Coz it’s easy enough to do that, right?

What’s it Safe to do in the Garden?

I still haven’t found an answer to this question about everyday gardening: What, if anything, can I do in the garden without gearing up in protective clothing? Having found no answer to that question, here’s my plan: Just water. Touch no plants.

Which makes this gardener just so sad.

Sources:  State of CT,   LymeDisease.org  and TickEncounter.org.

Making Gardens Safer from Ticks: No More Wildlife Gardening originally appeared on Garden Rant on May 18, 2018.


from Garden Rant https://ift.tt/2rTbgCb

Thursday, May 17, 2018

How to Create a Multilevel Garden

The post How to Create a Multilevel Garden appeared first on Miss Smarty Plants.

Gardening on a hill can be quite a challenge, but if you can create multiple levels out of the hill it will be a lot easier. This is a very simple process in theory but it will take a lot of effort in practice.

Though you could do this yourself, you might be better off asking a landscape designer like Allen Outdoor Solutions to help you work out where best to put each layer and how to create a flowing garden. You should certainly have a clear plan of what you are going to do before you start working so that you don’t waste your efforts digging!

The first thing to do is start planning what you are going to do with your garden. A simple drawing is probably enough to get an idea of what you plan to do.  Think about how you would like to move through the space and then where to put steps and paths through the plants and up and down the garden.

Once you have decided on your plan can you move on to the actual work. This will take a few days to complete so you should either put a few weekends aside plan for a week of work. Once you have the structure of your garden complete, you can move on to planting and adding the finishing touches to your space.

Patch of Heaven Gardens

Planning Your Space

Before you start, try using string to mark out where you are going to create each layer. This will help you to determine how deep each layer will be: too thick and you will struggle to reach the back of the bed but too thin and your garden will look chaotic. It might be a good idea to vary the layers  slightly to create some movement in the layout.

If you already have some ideas about which plants you want to use in your garden, you should make sure that your levels are deep enough to accommodate them. So, if you have a tree you would like to plant, make sure that you allow enough room for the roots to grow without interfering with the retaining walls you plan to build.

Think about creating a level where you can sit and enjoy the sunshine. Plan out this level so that you have enough space for some outdoor seating if possible and consider adding either some paving or gravel to make sure that you can use this space even when the ground is wet.


Use Retaining Walls to Create Levels

Whether you start at the top and work down or start at the bottom of the garden and work up is entirely up to you. However, starting at the top does have the advantage that you won’t be climbing over the work you have just done to get there. Either way, you will have to work with the slope as you remove excess soil or add topsoil and fertiliser to each layer.

Start by clearing the garden as it is at the moment. Get rid of any old plants that might have built up over years of neglect but do keep hold of any plants that you still like by digging up the roots carefully and transferring them to pots temporarily. This way they won’t get damaged by accident and can be put back when you are ready.

Next, you should dig the footings for your wall. This is what will support the wall you build to retain the soil so it needs to be a good depth. Once you have the right depth, pour in your concrete to create a solid base. This needs to be left for 12 hours to set before you can start building your wall on top.

Once footings are in place and fully set, you can start building your wall. You can use any type of stone, just make sure that you use the right consistency of mortar so that it holds together strongly. You can also go for any style, whether you prefer clean straight lines or a more rustic feel – either will look lovely in your garden.

Add a Water Feature

All gardens should have some water whether it is a small feature or a running stream. Water is one of the most calming sounds on earth and it is great for attracting animals to your garden too. With a multilevel garden, you have the perfect opportunity to add waterfalls pouring from each level and down the garden.

Plan your water feature before you start digging and building retaining walls, but if you already have done this then don’t worry – it’s not too late! Essentially, you are looking to construct a large staircase with a pool at either end and a pump to send the water back up the hill. This means that even if you have already put the layers in, you can still make your stream and waterfalls quite easily.

Unique water features

There are all sorts of styles of water feature that you could go for. One of the easiest ways to change the way that the water flows is by using different sized rocks. Large rocks will naturally mean a longer waterfall, where smaller rocks and gravel will create more of a babbling brook effect. Use flat and squared stones to create a more defined architectural look of a pool. This can look fabulous in a modern or minimalist garden style though it can take a lot more maintenance.

Clever Planting

How you plant your levels will make a big difference to the way it looks. More dense planting will disguise and soften the layers whereas thinner and more decisive planting will define each layer individually. What you choose to do is really down to your own personal taste and how you like to garden. If you are a fan of neat lines and order then it will be clear that softening the layers won’t be for you.

Think about the height each plant will grow to and plant accordingly. The great advantage here is that you can put smaller plants and flowers at the front of each level so that you can see them throughout the garden. This is great for injecting bursts of color into the garden, especially if you like formal gardening with symmetrical layers.

Though you might think you can’t use trees, they are actually a great way to link the layers up and draw the eye to the top of the garden. On the other hand, trees like Japanese Maples (also known as acers) are a great way to draw the eye down the layers as they stoop over the level. They are wonderful trees to grow and can bring a shock of color in almost every season depending on the variety.

Just like any other garden, you should always be looking for ways to draw the eye around the space and find points of focus. Just as you may have varied the size and proportions of your levels to create interest, so you should vary the size and shape of the plants you go for. Texture is always one of the most important things to think of in design terms and in plants, this is essentially the type of flowers and leaves you choose.

Creating a multilevel garden is a lot of hard work initially but once you have the layers in place, it is actually easier to maintain than your old hill. You might like to put a sprinkler system in place while your garden is still young to make it even easier to manage over the years, especially in the summertime.

Once the main features of the multilevel garden all in place, it will be much easier for you to add in the smaller details like outdoor lighting and annual plants and flowers. This is your time to make the most of the space you have by gardening on these more manageable flat areas.


This contributed post may contain affiliate links. 

The post How to Create a Multilevel Garden appeared first on Miss Smarty Plants.


from Miss Smarty Plants https://ift.tt/2wWk2oG

The Big House

A Michigan spring is a big fluid situation. We have cold days and cold nights. We have hot days and freezing nights. Every day is a new weather drama, with a new cast of characters. We have a glass roof over one room inside Detroit Garden Works. Once we start buying in seasonal and tropical [...]

from Dirt Simple https://ift.tt/2L8VHiJ

Lawn culture is the problem, not lawns by Elizabeth Licata

And lawn culture is still very much an issue.

My front “yard;” a lawn would never thrive here, even if I wanted one. Later, shade perennials will fill it in.

Otherwise, why would garden centers still be selling so much weed ‘n’ feed? I know from online discussions I see regularly, with gardening a hot Facebook topic every spring and summer here, that people still have lawns and don’t feel at all guilty about having them. What they feel guilty about is that their lawns are not perfectly emerald green and weed-free. Why else would they be asking about how to get rid of clover and other “invaders?”

Otherwise, why would I be able to drive through neighborhoods—and not just the suburbs either—and see green spaces dotted with multiple yellow warning signs that indicate recent chemical applications?

Otherwise, why would I be able to google any combination of “weed” and “lawn” and find page after page of search results, most absolutely guilt-free about offering the perfect bag of lawn treatment. (And I’m not sure the “organic” remedies are much of an improvement.)

It would be disingenuous to pretend that “perfect lawn” culture is not still very strong throughout the US. It’s true that most of the gardeners I know don’t subscribe to it; they mow what grows when they think of it and don’t worry a bit about what’s coming up besides turfgrass. But I can’t live in that bubble. I dislike lawn culture, not lawns.  Lawns are fine as an entity; I may find them kind of boring, myself, but I get that they are useful. Not for insects though, if lawn culture has its way.

Lawn culture is the problem, not lawns originally appeared on Garden Rant on May 17, 2018.


from Garden Rant https://ift.tt/2k2VYay

Wednesday, May 16, 2018

Gardening For Health! by Scott Beuerlein

I remember a day in April of 2003. It was one of those mythic, glorious spring days that sporadically show up between late freezes and tornadoes here in Ohio. And it was one to behold. Perfect. Most importantly, it was the first of such days that year. Truly “the first nice day of spring.”

It was the kind of day that gets every gardener outside gardening, and I decided to cut down a rank silver maple in the backyard so I could plant something better, or, as the case is with silver maples, so I could plant anything. Safety glasses and hearing protection on, and I’m quickly in my own little succession of tasks and intermittent random thoughts as I merrily progressed through the job. The ground was soon a “pickup sticks” mess of brush and logs. I remember sorting my way across this morass. I was happy. Happy to be outside. Happy to be outside on this glorious spring day. Working in the sun. Working in the sun with a chainsaw. Making progress on my yard. Making a better garden. I remember stepping on a log, and, Lord, don’t you just know it, it rolls like an alligator drowning a goat.  And off I go, airborne like Superman. Airborne like Superman with a running chainsaw in hand.

It’s funny how the mind works. It might take me twenty minutes and cause me a hernia to add three numbers together in my head, but in the fraction of a second it took me to plummet to earth, my brain clearly and correctly lined up a number of thoughts:

1) “Throw the chainsaw so you don’t sever something.”

2) “Oh, it appears as though I’m heading straight towards that big, knotty log.”

3) “Which I’m going to hit with my chest.”

4) “Surely, I’m going to break some ribs.”

5) “Son of a… I’m going to break my ribs on the first nice day of spring.”

Boom. In the moments that followed, writhing on the ground in agony, I remember being truly impressed by how terrible the pain was, but I was equally impressed with the supercomputer quickness of my thoughts in the span between dumb mistake and terrible injury. I had identified a threat, and eliminated it. I had assessed my plight, accurately predicted the outcome, and I even managed to put it all in context. All in a microsecond. Lying there, I pondered this. And I wondered how the hell that very same mind, the one that had ripped through those equations so crisply and precisely, was indeed also the exact same mind that apparently was unable to prevent the calamity in the first place.

Anyway, four broken ribs. Four weeks laid up, unable to breathe, cough, laugh, scratch my back, nod my head, change the channel, or have a fly land on my nose without a sharp, vicious reminder that I had broken my ribs. On the first nice day of spring. Fortunately for me, I have a garden and a lovely and caring wife, and she would occasionally wheel me out to sit in the garden where I could enjoy the healing beauty of plants and nature. In that peaceful environment, I recovered and, eventually, almost got back to normal.

A bench ready made for a good convalescence.

I found that same solace and peace from my garden as I recuperated after blowing out my back that time I tried to carry a boulder from my truck to a new bed in my backyard. As before, my wife would wheel me outside and I would sit amongst the blooms and the birds and heal. Likewise, my garden was a safe refuge after I fell off a ladder while pruning wisteria and landed on a nest of ground hornets. And it was there again for me that time when I burned poison ivy vines and had a terrible reaction. And, again, when a huge root ball rolled on my foot.

I live across the street from a bike path, and it’s a wonder how many people use it. They run, they walk, they bike, and they talk. All for their health, and I watch them as I garden, astonished that I’m often getting the same exercise as they are, but, at the end of the day, I’m also getting a beautiful garden while they’re just going around in circles. I laugh and shrug off the irony, knock the dust from my clothes, and call my wife to help stand me back up on my ruined knees. As I hobble inside, I shake my head thinking about the joggers. They just don’t get it, do they?

A path that beckons one to hobble further.

Several weeks ago I cut my finger to the bone because I was using my open pruners as a hammer. They slipped. I got cut, and bled, and bled, and bled. I should have got stitches, but I didn’t. I did get a raging infection. A few days off work recovering in the garden, and I only had a scar as a reminder. The next finger over won’t bend at the outside knuckle. It was smashed between a pair of landscape timbers during a project. I read on my hospital chart during one of the remarkably long intermissions between any kind of medical attention in the ER that the medical term for my injury was “Acquired Deformity.”

What an “acquired deformity” looks like.

I’m so glad I have a garden. I’ve seen numerous studies that indicate that hospital patients who have a view of gardens or nature survive more often, heal faster, suffer fewer complications, and require less pain meds. I think of this every time I take only three Aleve instead of four before I go out string trimming. I just can’t believe the amazing amount of heightened recovery my garden has so generously gifted me with after the many injuries I’ve incurred. In the fullness of time, some of these memories come to me almost like old friends. The post hole digger to the chin episode. That time a walnut fell from 50 feet up and knocked me out. Or when I stepped on a garden rake and got whacked on the nose by the handle. That time I got my calf caught in the tiller. Or when I burned my hand on the spark plug of a blower. Oh, and there was that time I was chopping up yard waste with my mower and a chunk of wood flew out and hit me in the crotch. The pebble in the nostril incident. That time I face planted into the roses trying to jump a fence while being chased by a raccoon. After each of those times, I found renewal and joy in my garden.

I wonder how people without gardens get by? How do they do it? No flowers to gaze upon. No trees to convalesce beneath. No bird songs. No buzzing bees. No delightful fragrances. No paths to wander. No calming perspective. No spiritual fulfillment. No Zen moments. These people. These people who have none of this, where do they go with their pain?

Me? My garden is my happy place. Sure, it’s a lot of work, but what a treasure to have when an injury comes along, or a rare soil-borne disease, or some kind of strange bullseye rash. And I just wonder where the hell I would be without it?


Gardening For Health! originally appeared on Garden Rant on May 16, 2018.


from Garden Rant https://ift.tt/2Gmn1Go

Saturday, May 12, 2018

Early May

Our bitterly cold and record breaking April gave way to an early May that has been too warm, too windy, too rainy and very stormy. Of course it has. Every plant that hunkered down in April was shoved into bloom and leaf by unseasonable heat. This is anything but a cool and slowly evolving spring. [...]

from Dirt Simple https://ift.tt/2IiQsex

Friday, May 11, 2018

How to Apply Fertilizer to Potted Plants

The post How to Apply Fertilizer to Potted Plants appeared first on Miss Smarty Plants.

Plants need sufficient nutrients regardless of where you grow them. Many homeowners prefer growing them on the ground while others prefer using containers or pots. In the case of the latter, certain things should be taken into consideration. Here’s our guide on how to apply fertilizer to potted plants this spring. 

Use Potting Media at the Start 

The three primary elements that any plant needs to grow well are nitrogen, phosphorus, and potassium. What’s special about potted plants compared to those grown on the ground is that they require more soil nutrients. Likewise, these container plants do not have a huge source of soil to utilize in the first place. 

We highly recommend a commercial potting media as a start. This product typically contains sufficient fertilizer to feed the newly grown plant with the three nutrients for nearly a month. After this time, you have to rely on either liquid or dry fertilizer products. 

How to Apply Fertilizer to Potted Plants This Spring

Using a Liquid Fertilizer

Regardless of type, you can assess the nutrient ratio of a fertilizer by looking at the three numbers indicated on the package label. These three numbers refer to the respective percentage of nitrogen, phosphorus, and potassium in the fertilizer. 

First, the liquid fertilizer comes in either powder form or as liquid concentrates. If it’s in powder form, you’d have to dissolve it using water before you apply it to the soil in the pot. Since it’s in liquid form just like water, a commercial liquid fertilizer will have a dye for quick recognition.  

If you intend to grow herbaceous perennials such as the fragrant dianthus and the heuchera plant in pots, you should use a 20-20-20 commercial liquid fertilizer specifically made for houseplants. A 10-8-8 nutrient ratio or any similar amount is also good for these herbaceous plants.   

Here is a video of using a liquid fertilizer:
https://www.youtube.com/watch?v=Eras70iKlC0 

Choosing a Dry Fertilizer  


On the other hand, a dry fertilizer comes in two forms: as a granular fertilizer or as a slow-release fertilizer. Furthermore, the slow-release variant can be made up of either pellets or beads. As its name implies, a slow-release dry fertilizer can feed the soil with nutrients to last up to nine months.  

In order to use slow-release beads or pellets, you must scatter one teaspoon of the product for every gallon of soil. However, slow-release fertilizer alone won’t lead to robust plant growth. You should still use liquid fertilizer or granular fertilizer every two or three weeks. Treat the slow-release fertilizer as a backup solution in case you forget to feed your potted plants for some time. 

Consequently, a granular fertilizer is the popular choice for growing potted plants. It reaches the part of the soil where the root systems are with the help of water. Basically, you have to use half a teaspoon of the fertilizer for every gallon of potting mix. Water the potted plants as soon as you apply fertilizer.  

How to Apply Fertilizer to Potted Plants This Spring

Preventing Salt Accumulation 

Compared to a liquid fertilizer, a dry granular fertilizer won’t be immediately leached from the soil. The problem here is that salt from the fertilizer can accumulate. A white crust can appear on the surface of your potting soil. Eventually, your potted plants could have wilting foliage or burnt roots due to the excessive amount of fertilizer but this can be prevented by watering plants deeply so that water runs out the bottom of the containers.

Try using a 10-10-10 granular fertilizing during the seasons of spring and summer. As for the winter season, fertilizing your potted plants should be done just twice or thrice. This frequency is enough since the plants won’t be actively growing at this time. 

Using fertilizer for your potted plants in spring isn’t difficult. Always use potting mix for new plants to help them grow well. Afterward, use a combination of slow-release fertilizer with either liquid fertilizer or granular fertilizer.  We hope that you learned a lot from our quick guide. If you have any queries, do send us a comment. 


The post How to Apply Fertilizer to Potted Plants appeared first on Miss Smarty Plants.


from Miss Smarty Plants https://ift.tt/2IeL5Ne

Wednesday, May 9, 2018

Choosing The Perfect Water Feature For Your Garden

The post Choosing The Perfect Water Feature For Your Garden appeared first on Miss Smarty Plants.

Spring is well and truly upon us and though many are currently enjoying the burst of color and vivacity afforded by the season, we’re also looking forward to the summer. It is, after all, in those warm summer months that our gardens feel more mature, more grown in and at their most visually spectacular. This is the time of year so many seasoned gardeners look forward to, when the fruits of the winters’ labor and planning pay off and we have months of relaxing in beautiful surroundings to look forward to. Yet, while most of us will be content to enjoy our sunny mornings sipping coffee and basking in the sun as the grass of the lawn gently caresses our toes, there are some for whom this is the year when their garden gets a little added wow factor.

And what says wow factor better than a water feature? The summer months are the perfect time to spend by the water for added relaxation and pleasure while water features also add a little extra glitz and glamor to the space. It’s simply a matter of choosing the right feature for you…

Unique water features

A swimming pool

Nothing says opulence and luxury more eloquently than your very own pool. It’s long been considered a symbol of wealth and opulence but if you feel that it’s the best fit for your garden, you should be aware that it’s a big commitment. Swimming pools require regular maintenance and repair, although the advent of vinyl liner swimming pools has made some elements of pool ownership a little more hassle free. Visit Sparklean Pools to learn more about vinyl liner pool repair. Vinyl liners generally need to be replaced every 12-15 years but they are relatively easy to repair and maintain. If your prepared to put in the time and effort, nothing says wow like a sparkling clear swimming pool.

A wildlife pond

If you’ve never been much of a swimmer but still like the idea of an open expanse of water, perhaps a wildlife pond might be more to your taste. Fill it with fish and relax by your pond as the local bird life comes by every once in a while for a refreshing drink. This is a far more understated look than a fountain while allowing you a better chance to commune with nature. Just be aware that a very specific pH balance is needed to keep your water clear. It doesn’t need to be crystalline in quality but it shouldn’t look like pea soup either. A dash of calcium sulphate in your water may be enough to keep it clear, although if you’re thinking of invest in in carp for your pond be aware that they have a tendency to displace sludge from the bottom of your pond so you’ll likely need a decent filtration system.

Unique water features

A bubbling millstone

Not so long ago stainless steel water walls were all the rage but if this is too ostentatious for you, how about a humble millstone constantly bubbling with a cone of water. This makes for a modest but beautiful centerpiece which is low maintenance and fairly inexpensive to run. They rarely need to be cleaned out and a pump can last years and years.

Water way to have a good time!


This contributed post may contain affiliated links. 

The post Choosing The Perfect Water Feature For Your Garden appeared first on Miss Smarty Plants.


from Miss Smarty Plants https://ift.tt/2wqKhU5

First Lady Jill Biden and the White House Garden

Now that almost everyone concedes that the Bidens will be moving into the White House soon (hopefully, soon enough!), local garden writers ...