Tuesday, July 31, 2018
Monday, July 30, 2018
Making Peter Great Again – One Fountain at a Time

The same with back-yard fountains. Sure, they offer bubbling sounds and elegant gushes of water at the flip of a switch, but the pumps go bad, the dirt clogs the outlets and it can be difficult to keep the hungry goldfish trapped within them happy.
Chances are the house, yard and garden fountains will eventually be sold to some minimalist gardener who only cares to raise a few onions in some ecologically-pure raised bed anyway.

Then there was Peterhof, the cozy 1,250-acre Russian complex of paths and gardens, 150 incredible fountains and a looming yellow palace first brought to light by aptly-named Peter the Great in St. Petersburg in the early 1700s.
Three centuries later it still tells a larger story: To hell with downsizing
Our summer visit there was part of a cruise ship trip to the Baltics, a journey that took in Russia, Denmark, Estonia, Finland, Sweden and the Netherlands.
We saw plants aplenty – including a much too brief stop at Tivoli Gardens in Copenhagen, with its 15 separate gardens dating back to 1843 spread amidst a circus of splendid carnival rides and the ghosts of its 80,000 tulips that appear each spring.
But it was Peterhof that inspired the most memories – and we barely had time to wander one-tenth of the place. Downsizing for Peter the Great – and all those who came after him – was not on their agenda.

Peterhof was absolute proof there’s still a place in this world for a minimal amount of oversized attitude with a large nod in the direction of art history and engineering – and at least the Russians are paying for it. The Mideastern oil sheiks seem to try the same, but much of their works seems over the top and offensive.
Along with the clinging joy of honest sweat and dirt under the fingernails, that’s another thing I like about gardening; it asks that you wander the world a bit to examine what came before, and what a tiny place we all now occupy in that food chain.
Peter the Gardener, a big, handsome, alcohol-loving mix of foresight, genius and brutality, first mentioned the Peterhof site in his journal in 1705, but only as a good place to build a landing for his war efforts.

It all evolved from there, but only after he and his ancestors brought it some architectural help from France and Italy and the like. They also had ready access to about 10,000 laborers with absolutely no choice in the matter.
Few of them, I suspect, got any medical and retirement benefits or paid vacations. In fact, my first thought upon seeing all those massive, gold-edged European castles, palaces and churches is always of the people who built them. The rest of it is aristocratic arrogance and God’s misspent money.
So, evolve Peterhof did. It grew several palaces, the grandest being The Great Palace built during the reign of Empress Elizabeth. And over time such palace walls across Russia and Europe were coated with paintings by Rembrandt, van Gogh, Goya and such.
For all that, Peterhof reached its true glitzy height when Catherine the Great, the Russian Hostess With the Mostess from 1762 until 1796, held all-night parties there illuminated by 10,000 candles.
Peterhof has a lot of shrubs, flowers and trees; many of which I see back home again in Indiana. Although I know better – and have traveled the European world a fair amount looking at gardens – that is always something that still surprises me a little. I mean shouldn’t Mother Russia offer us only Russian plants, and if they had to send one to us, why the very invasive Russian olive? Was Putin behind that?
In a totally horrible way, Peterhof was downsized by the Germans in World War II. The pictures show a bomb-shredded landscape, smashed walls and fountains torn to pieces. It was war-mentality so ugly Stalin bombed it just to forgo Hitler the pleasure of using it.
But the outsized gardens mattered in Russian history, and to its people. The fountains were rebuilt to full size and working condition. All of them. There was no downsizing. The place meant too much. Peterhof now gets 4.4 million visitors a year.

Those fountains are amazing. Their inherent genius is the leaping streams of water are not pushed by pumps, but through huge lakes and reservoirs built above them. The gravity-fed water flows downhill through pipes, the water pressure building to the point the fountain spray erupts 60 feet into the air.
The most glorious of them – the Sampson Fountain with its golden figure of that legendary warrior wrestling with the jaws of a lion – is the centerpiece of the Grand Cascade. Its 64 fountains and 200 bright-gold statues gush water in all directions, an elegant frenzy of art, engineering, history and spectacle. All that water then flows gently down the Sea Canal past other surging fountains to open waters.

Some credit, please, to those ancient artists, architects and forgotten laborers. Their fountains first cranked up in the early 1700s – more than 300 years ago. The Germans stole the original Sampson during World War II. The Russians replaced him by 1947. Fully operational and still going. Wow.
No downsizing there.
Making Peter Great Again – One Fountain at a Time originally appeared on Garden Rant on July 28, 2018.
from Garden Rant https://ift.tt/2LCPz6p
Sunday, July 29, 2018
How Are You Giving Back To The Earth?
The post How Are You Giving Back To The Earth? appeared first on Miss Smarty Plants.
Once a year, on Earth Day, we all tend to be a little more conscious about how we’re treating the world we live in. We think about how we live, and the impact that it has on the planet. But what happens for the rest of the year? Do we just let it go, or should we continue on with our efforts?
The below infographic shows you exactly how you can keep up your Earth Day practices year-round to really give back to the earth. But here are three key points that you can start with.
Look After Your Lawn
First of all, you’re definitely going to want to take better care of your lawn. If you’re overusing fertilizers and chemicals, you may find that it then goes on to affect the rest of the ecosystem – and that’s definitely the opposite of what you want to happen.
Be Resourceful
Next, you’re going to want to make sure that you’re being conscious of what you’re using – how and you use it. Here, we’re not only talking about recycling what you use trash wise, but also what you’re using in the garden. It’s easy enough to set up a water tank to collect rainwater and use it for watering the garden – and this can save on water waste for the garden.
Volunteer
Finally, you may also want to volunteer your time to local organizations that are looking to clear up the community or rivers, parks, and community gardens too.

Infographic Design By Earth Day Tips
The post How Are You Giving Back To The Earth? appeared first on Miss Smarty Plants.
from Miss Smarty Plants https://ift.tt/2NVNyi9
The Summer Containers
from Dirt Simple https://ift.tt/2LvMFjv
Friday, July 27, 2018
The Sights of Cornell, Ithaca and More

Almost on a whim I drove to Ithaca to attend the Children and Youth Garden Symposium being hosted by Cornell (with the American Horticultural Society), and I’m glad I did.
First, the stunning beauty of the campus, the town and the whole region reminded me not at all of the flatlands of Northern Ohio where I went to school. Above is the Plant Sciences Department, where the symposium was held.

One treat was meeting Craig Cramer, who started a blog way back when the Rant launched and became an early commenter. Here he is in his office showing off one of the many scanned-art works he’s famous for. See lots more on his blog Ellis Hollow.

The Cornell Botanic Garden, until recently unfortunately named the Cornell Plantation, was so much more than I’d expected.


The Herb Garden was my favorite part, so much so that I couldn’t choose between these shots.


The Cornell BG includes a whole arboretum with this lake, a shrub collection and much more.

And possibly unique among botanic gardens? A big honking gorge! The Cascadilla Gorge and its trail connects connects the Cornell campus with downtown Ithaca.
You got that? Stunning natural areas right in the middle of the city! I walked part of the trail early one morning and a dog-walker recommended I climb the narrow Cascadilla Park Road that runs along the gorge, calling it a “really cute street.”

Sounded good to me and sure enough, there were gardens and funky homes everywhere.

The architecture in this neighborhood and throughout Ithaca is a fabulous mix of my favorite home types.


Cute house, impossible upkeep? Boy, I’d love to know how often this hedge has to be trimmed and how long it takes. (I’m nudging my housing coop to stop recommending hedges, despite their prominence in the original plan for the town.)

Like any good boomer tourist, I had to find the original Moosewood Restaurant, in downtown Ithaca. Larger than I imagined, but just as lively.

A fun symposium event was visiting the Ithaca Children’s Garden, shown here with AHS president Beth Tuttle and AHS horticulturist Dan Scott.

The Anarchy Zone presumably doesn’t have to look like a garden. On the right, who doesn’t love a labyrinth?


Honey-harvesting and -tasting.

For still more nature-in-the-city, I visited Stewart Park along Cayuga Lake (one of the famous Finger Lakes) and found it positively strewn with folk music performers. Felt like home.

And going all-out-nature, I visited Treman Gorge, just 4 miles outside of Ithaca and a top recommendation by my old friend Craig Cramer.

Coming soon to GardenRant: what I learned at the Youth and Children’s Garden Symposium, which I promise I really attended.
The Sights of Cornell, Ithaca and More originally appeared on Garden Rant on July 27, 2018.
from Garden Rant https://ift.tt/2Lr9uot
Thursday, July 26, 2018
Tuesday, July 24, 2018
Monday, July 23, 2018
Home For The Garden Cruise
from Dirt Simple https://ift.tt/2mANfxx
Saturday, July 21, 2018
Common Gardening Mistakes
The post Common Gardening Mistakes appeared first on Miss Smarty Plants.
Gardening is a fun and rewarding task, but it can be incredibly stressful and complicated too. No gardener is perfect just like there is no such thing as the perfect garden, so, whether you’ve been gardening for six days or sixty years, we all make the odd mistake here and there. Of course, making mistakes gives you the opportunity to learn, but it’s always better to learn beforehand and avoid them when you can. Keeping that in mind, here are four common gardening mistakes everyone makes.
Planting Way Too Early
Once you’ve bought your seeds, soil, and everything else you need, it can be tempting to get planting right away. We all get impatient now and then, but you have to hold yourself back and resist the urge to start planting. You need to take the time to prepare your seeds, and your soil or nothing is going to grow. Make sure you dig and double dig the garden beds, adding plenty of compost as you do. This ensures that the ground is fertile and loose enough for your plants.

Forgetting About The Sun
Before you start to dig and plant, you need to ensure that the spot you have chosen is suitable for your plants. We know that plants require sunlight to grow, but different varieties have different needs. Where some require almost constant sunshine, others prefer to be in the shade for most of the day. Because of this, you should do some research on the plants you intend to grow before you buy them and make sure that you have a spot in your garden that will work.
Letting Weeds Grow
Weeds will compete with your plants for light, water, and other resources, so it’s crucial that you deal with them as soon as you can. Unfortunately, weed control can be tricky to master, so you need to do plenty of research to avoid damaging your own plants. You might even want to consider hiring a professional to help you out. Whatever you do, ensure that you stay on top of the issue or it will quickly get out of control.
Over Or Under Watering
You need to make sure that your plants get the right amount of water or they simply won’t grow. If they get too little, they’ll start to wilt and will eventually die, and if they get too much, then their roots will begin to rot, leading to the same result. Most plants need watering between one and three times a week, but this will depend on the variety and weather. Make sure that you get the ground, rather than the leaves, or the water won’t reach the roots.

Everyone makes gardening, and while they offer a great opportunity for you to learn, it is best to avoid them when you can. Hopefully, with the tips and advice above you can do just that and ensure that your garden remains beautiful and healthy all year around.
This contributed post may contain affiliate links.
The post Common Gardening Mistakes appeared first on Miss Smarty Plants.
from Miss Smarty Plants https://ift.tt/2LfRu0f
Pond Life: Building Your Very Own Pond
The post Pond Life: Building Your Very Own Pond appeared first on Miss Smarty Plants.
Your garden is your own private piece of mother nature’s bounty. It’s your refuge from the world and all its problems. It’s a place in which you can relax, unwind and meditate while surrounded by nature’s subtle perfumes. We all have a slightly different idea of what makes the perfect garden. Some will use their garden as a resource to grow delicious and nutritious food for their families. Others will use it to make a statement, filling it with a dazzling array of plants and statement pieces like water features to wow guests. Others will simply aim to create an outdoor haven in which they, their family and guests can be at peace, sip lemonade, read a book and simply enjoy the psychological and spiritual benefits that come with being surrounded by nature.
For these people, some form of water feature is a wonderful way to not only make a statement but add to the soothing ambiance of their outdoor space. We all find proximity to water relaxing and a pond is a wonderful way to add character to your garden while also enhancing its relaxing and restorative qualities. Think adding a pond to your garden will be too much hard work? Think again. Like anything else, installing your very own pond is easy… When you know how.

Pre-made or create your own?
If the prospect of installing your own pond makes you a little nervous, you can always opt for a premade pond available in most garden centres. Premade ponds have their own inherent advantages and disadvantages. You are beholden to a particular shape when using a premade pond but they are relatively quick and easy to install and come in a wide range of shapes and sizes. They tend to be smaller and shallower than traditional liner built ponds. As they’re smaller it may be harder to maintain an ecological balance within them, meaning that your pump and skimmer may need to work a little harder. Moreover, smaller ponds are prone to overheating, resulting in disproportionate algae growth.
Preparing and marking off the area
Your first decision is where your pool will go. If you’ve already been to the garden center to check out some premade ponds then you likely have a good idea of the kind of size and dimensions that you will be dealing with. If you’ll be starting from scratch using impervious lining, you will have more freedom in deciding your dimensions. Perform a rough check of the measurements and it’s also worth checking in with your local authorities to ensure that there are no underground cables or pipes in the area that may be disrupted by your excavation.
When you have decided on your location, mark out the dimensions of the pond in rope or spray paint. It’s more than likely that you will need a water pump and skimmer. You can check out a selection of pumps for your pond right here. Place your pump and skimmer at opposite ends of the pond. If you’ll be using a waterfall filter, install this at the opposite end from your skimmer.
Excavation
Now it’s time to roll up our sleeves. Dig your pond area approximately 6-8 inches deep. If you’ll also be installing a waterfall, use the dirt to build a wall to seal in your waterfall box. If you’re using a premade pond, it’s a good idea to leave around an inch or two of leeway between ground level and the dept of your pond. Once the area has been dug out, use some spray paint to mark out an outline for the deeper area of your pond. The size and shape are entirely up to you, but since will be filled with rock, it’s a good idea to avoid tight curves. The inner area should be excavated to a depth of around 2 feet. Finally, excavate a separate area for your skimmer box. Plan so that the skimmer opening will be around 1″ above water level. Install your skimmer and pump and connect an outflow pipe to the back of the skimmer.
Laying down the liner
Again, assuming that you haven’t opted for a premade pond, it’s now time to lay down the liner. But first we need to add a layer of underlay, working it into the rough corners of the pond. The best bet is to start at the middle and work your way outwards. The pond will move and settle over time so it’s a good idea to lay it down fairly loose. If you’re at all unsure there’s a great tutorial video here. Repeat the process again with your pond liner. Attach the liner to your skimmer box using the faceplate.
Boulders, rocks and gravel
Now it’s time to rock! Put larger boulders down first for structural support, and mark out the pond’s vertical walls. Next, fill in with smaller rocks, starting from the bottom and stacking on the inside of the pond. There’s no real right or wrong way to do this. It’s time to get creative, and feel free to rework the area as much as it takes to get it right. Attach your liner to the water box and use a layer of gravel to fill in any gaps in the rocks and boulders.

The finishing touches
Before you fill the pond now is the time to add any lights you may want to nestle between boulders or add bog plants or lillies. You may also want to apply a fish friendly waterfall foam to fill in the gaps between rocks in your waterfall area. This will lend it structural support and help to encourage water flow. While the pond is filling with water, go around the perimeter trimming off your lining. Leave a margin of around 6 inches which you can then cover with gravel for a seamless appearance.
Et voila! A perfect and peaceful pond! Now it’s simply a matter of choosing the right fish!
This contributed post may contain affiliate links.
The post Pond Life: Building Your Very Own Pond appeared first on Miss Smarty Plants.
from Miss Smarty Plants https://ift.tt/2JJgyqL
Redesigning Features of Your Backyard
The post Redesigning Features of Your Backyard appeared first on Miss Smarty Plants.
When it comes to gardening, many of us focus on maintenance. We mow the lawn, trim bushes, prune trees, pull up weeds, and water any herbs and plants that we’ve bedded and are nurturing. However, every now and then, you might want to take larger, more significant, and more structural change into consideration. Why? This can really make your outdoor space look like a completely different place in a positive way. Now, these changes take a little more time, planning, preparation, and investment, but the outcomes are more than worth everything that goes into them. So, if this sounds good to you, here are a few different options for you to consider!

Installing a Patio
When we think of backyards, we tend to think of relatively green spaces. But your backyard has so much more potential than hosting lawn alone. Patios are a brilliant addition to almost any property’s space. Patio makes your outdoor space useable, providing you with a flat surface outdoors where you can place tables and chairs, sun loungers, or other furniture. Realistically, you’re not going to be able to install this yourself. That is, unless you want to invest some serious time and money into becoming qualified as a professional contractor. So, collaborate with professionals in the field who will be able to carry the work out on your behalf. Once the patio is fitted, you can add extra touches for flair, functionality, and comfort. High-quality backyard furniture from patioproductions.com will suddenly become a feasible option, as you’ll have a stable flat surface to rest it on!
Installing a Pond
While ponds may not be the best option for those with kids and pets (any expanse of water could pose a safety risk), they are great for many. Not only do they act as a source of water for various animals and birds, but you will see little eco-systems starting to establish themselves within the pond itself too, as it will provide a habitat or water source for birds, small mammals, and amphibians such as frogs, toads, and newts. The easiest and most sensible way to establish a pond is to leave the work to professionals who will have all of the necessary equipment to dig a deep enough hole, line it, fill it with water, and make everything look a little better finished and a little more natural than a DIY job would be likely to produce.

These are just two different options that you have on hand if you’re considering doing a little extra work on your backyard this summer. Not only will they make the space more appealing and functional for you to spend time in, but the latter will also help local wildlife and your local ecosystem too. Your project will result in winners all round!
The post Redesigning Features of Your Backyard appeared first on Miss Smarty Plants.
from Miss Smarty Plants https://ift.tt/2zUaM60
Friday, July 20, 2018
Will it Sting? Bee or Wasp?
Will it Sting?
Will it sting? How to tell is it a bee or a wasp? Is it something should worry about with my children or pets around? Is it aggressive? Can I treat this myself, or should I hire a professional? There are lots of questions we get from clients when it comes to stinging insects. Here’s a good beginners guide to commons stinging insects found in the Greater Lancaster, Harrisburg, and York areas.
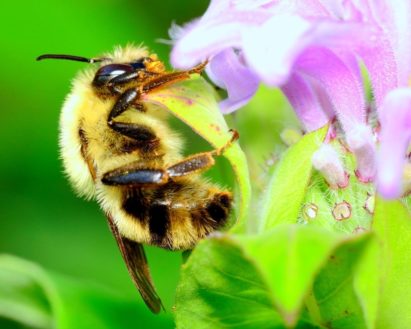 Bumble Bee
Can it sting? Yes.
Is it aggressive? No.
Are they beneficial insects? Yes, they’re pollinators.
Where will I find them? Most often, you’ll see them in gardens, moving from flower to flower. This goes for vegetable gardens, too, when your tomatoes and peppers are in bloom. These do not require hiring a pest control professional.
Honey Bee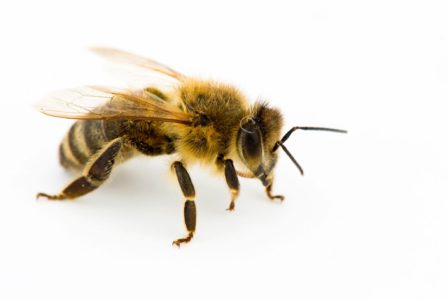
Can it sting? Yes, if threatened. However, each worker can only sting once.
Is it aggressive? No.
Are they beneficial insects? Yes, they’re pollinators.
Where will I find them? Similar to bumble bees, you’ll most often encounter them in your gardens. Honey bees have been known to set up colonies in strange places, ranging from trees to the interior walls of homes. NOTE: Honey Bees are protected by law. If you have positively identified a colony, contact a beekeeper to remove the nest.
 Carpenter Bee
Can it sting? Females, yes. Males, no.
Is it aggressive? According to Penn State (hyperlink: https://ift.tt/2O71jeL), males defend their territory aggressively but are not a threat to people.
Are they beneficial insects? Yes, they’re pollinators.
Where will I find them? You will most often see carpenter bees anywhere there’s wood on the property. You may find them using the rafters of your home for a nest (going in and out of the soffit) or the wood that makes up your deck. Accessing the nesting site may prove challenging for homeowners, so professional help is often recommended.
Cicada Killer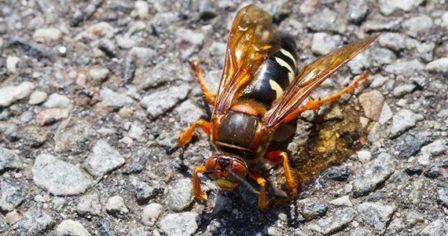
Can it sting? Males, no. Females, yes, and stings are exceptionally painful
Is it aggressive? Males hover over their burrows and look aggressive, but you basically have to step on one with bare feet to get stung.
Are they beneficial insects? Not pollinators but do feed on cicadas. They sting the cicadas, leaving them in a coma-like state. They then lay their eggs in the cicada, and when they eggs hatch, they have a fresh meal on-hand (the cicada). This makes them a type of insect known as “parasitic wasps.”
Where will I find them? You will find cicada killer wasps in the ground. Usually in thin turf or bare ground you’ll find their little burrows, with soil dug up and pushed out of the hole. Professional control is not usually needed, but many companies offer control. Homeowners may do control themselves, but exercise caution.
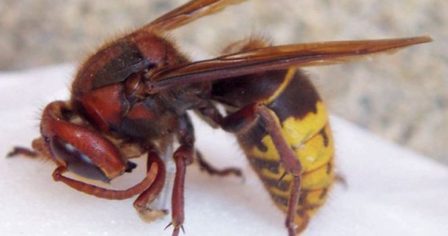 European Hornet
Can it sting? Yes.
Is it aggressive? Yes, very.
Are they beneficial insects? Not pollinators but are carnivorous with other insects.
Where will I find them? European hornets often are the only true hornet we have in North America. We often get calls from clients that have a diseased or dying tree on the property, and the hornets have nested in there, but have also been known to nest in wall voids. If you suspect you have a nest, give it a wide clearance, and call a pest control professional.
Bald-faced Hornet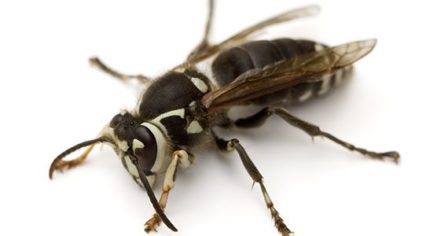
Can it sting? Yes.
Is it aggressive? Yes.
Are they beneficial insects? They are not pollinators. They do eat other insects, especially flies and other types of yellow jackets.
Where will I find them? Bald-faced hornets will typically build a nest, similar to paper wasps. These will often be hanging from something, like the eaves of the home or a tree branch.
 Mud-Dauber Wasp
Can it sting? Yes.
Is it aggressive? No.
Are they beneficial insects? Mud-daubers will feed on spiders, so I guess that depends on your perspective.
Where will I find them? Mud-daubers are so named because they frequently build mud “tubes” on the side of a structure. You will find these tubes in places that are protected from rain, like the top of an exterior wall near the eaves. This is so that the mud they build their nests from doesn’t get wet and fall apart.
Yellow Jacket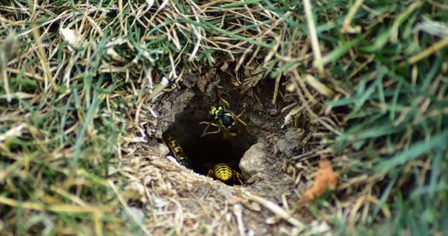
Can it sting? Yes.
Is it aggressive? Probably the most aggressive we deal with. If you encounter them, we encourage you to physically run away and call a pest control professional. They will attack in large numbers and can sting repeatedly.
Are they beneficial insects? Not pollinators. They do eat other insects, but it’s not worth keeping them around.
Where will I find them? Yellow Jackets can either make a nest in a structure OR a nest in the ground. Many homeowners accidentally encounter them when gardening during the summer. They will also build nests in a structure that can get rather large; we’ve dealt with several homeowners who can actually hear the buzzing of a large colony between the walls of their home.
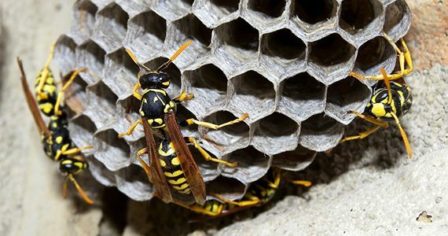 Paper Wasp
Can it sting? Yes
Is it aggressive? Only when disturbed.
Are they beneficial insects? Like cicada killers, they are parasitic wasps. They sting other insects and paralyze them so their young can feed at a later time.
Where will I find them? Paper wasps build nests using chewed up tree matter, hence the term “paper” wasp. These nests are frequently in trees. We most often talk to clients that encounter a nest when mowing under a tree in their yard.
Bee or wasp stings can be painful. If you see a stinging insect on your property that isn’t listed here, or you’re having an issue with one of the pests listed above, we’d be happy to consult with you. Please Contact Us, and we’ll do our best to be of assistance.
The post Will it Sting? Bee or Wasp? appeared first on Tomlinson Bomberger.
from Tomlinson Bomberger https://ift.tt/2O646F8
Thursday, July 19, 2018
Wednesday, July 18, 2018
Tuesday, July 17, 2018
You’ve Done the Work: Now Enjoy Your Yard!
The post You’ve Done the Work: Now Enjoy Your Yard! appeared first on Miss Smarty Plants.
You’ve spent months working hard on your yard. You’ve toiled, you’ve been sweating, you’ve put all the reading you’ve done about gardening into practice, and now in it’s finally finished! While you’ll always need to stay on top of your gardening to ensure nothing falls into a bad state, for the most part, your job is done. So what now? Why, it’s time to enjoy your creation from the inside – that means, making your outdoor space an enjoyable place to be. We take a look at how you can do this below.
Into the Outdoors
It’s more enjoyable if your outdoor space and the interior of your home aren’t exclusively separate. They should feed into one another, as if they were joined (which they are). To do this, look at opening up the back of your home to let in more light. If you have french windows, then you’ll be able to see outside and be more tempted to spend time there. It’s also much nicer to have a home filled with natural light, especially during the summer months.

Getting Comfortable
Once you step into your backyard, you’ll want to find decking or a patio there, upon which you can spend long days enjoying the sunshine. Add some affordable outdoor furniture, and a BBQ, and your summers will be filled with family and friend get-togethers. While you’ll spend your evenings on the patio, you might want to spend the summer days on your grass. In which case, you should strongly consider buying a hammock. There are easy enough to store, and will transform the relaxation levels of your outdoor space.
Lighting
You’ll have your decking, chairs, tables, and so on, and now it’s time to add some outdoor magic. Adding fairy lights and other lighting fixtures to your garden will make your yard feel more charming and enchanting. When the sun goes down, there’ll be no need to head indoors to see each other – just switch on the lights. If you want to take the magic a little further, you can look at adding a firepit. These are especially awesome to have in early spring and fall, when the weather is pleasant but chilly in the evening.

Privacy
For all the additions to your yard, you won’t be able to enjoy fully until you feel like it’s private. Even though your neighbors probably aren’t watching, no-one wants to feel like they’re being watched! Adding fencing and hedges around the edge of the garden to add an extra level of privacy.
Bring the Fun
Finally, don’t be afraid to bring a little bit of your personality to the yard! Colorful gnomes, works of art, and other staples of “you” will make the yard feel more homey. If you’ve got kids, make the yard fun for them too by adding a splash pool or a swingset.
With these additions, you’ll be able to enjoy your yard for years to come!
This contributed post may contain affiliate links
The post You’ve Done the Work: Now Enjoy Your Yard! appeared first on Miss Smarty Plants.
from Miss Smarty Plants https://ift.tt/2NpgQFD
First Lady Jill Biden and the White House Garden
Now that almost everyone concedes that the Bidens will be moving into the White House soon (hopefully, soon enough!), local garden writers ...

-
Now that almost everyone concedes that the Bidens will be moving into the White House soon (hopefully, soon enough!), local garden writers ...
-
Neither sorrow nor fear has diminished home gardening’s potential to heal during this pandemic spring. Chris Beytes of Grower Talks, the...
-
One of the most common calls we get throughout the season is about “patchy” looking lawns. These calls can come from current clients or pot...


